Press "Enter" to skip to content

[카테고리:] 컴퓨터

C# 포켓 1945 게임???? 소스???

Pocket 1945 – A C# .NET CF Shooter
출처 : http://www.codeproject.com/KB/mobile/CfPocket1945.aspx

 pocket1945.zip pocket1945src.zip

Introduction
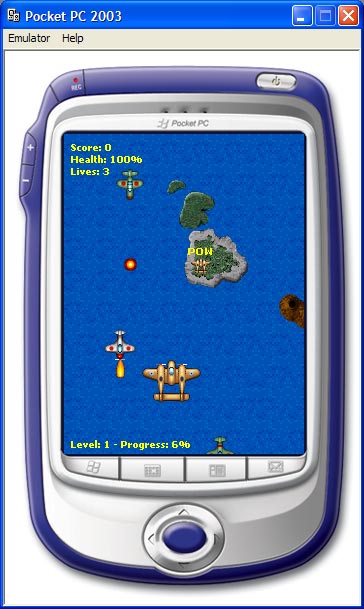
Pocket 1945 is a classic shooter inspired by the classic 1942 game. The game is written in C# targeting the .NET Compact Framework. This article is my first submission to Code Project and is my contribution to ongoing .NET CF competition.

As well as being my first article this is also my first game ever. My every day work consists of building data centric business applications, so game writing is something completely different. So, go easy on me.

One of my goals when starting this project was to make a game that other developers could use as a starting point when getting into C# game development. I focused on keeping the code as clear and simple as possible. I also wanted to build this game without introducing any third party components such as the Game Application Interface (GAPI). The reason I did this was that I wanted to see what I could do with the core framework. Another goal was to take this game/example a step further than most tic-tac-toe examples and actually build a game that?s fun, challenging and looks good.

One of the things I realized when working on this project is that games take time, no matter how simple they are. The game is still not at version 1.0, but it is playable in it’s current state. I?ve put the game up as a GotDotNet workspace and I encourage everyone that finds the game fun to join the workspace and help me build a fun shooter for the Pocket PC platform.

How to install/play Pocket 1945
In order to play you need a Pocket PC enabled device with the .NET Compact Framework 1.1 installed. To install simply copy the Pocket1945.exe file and the level XML files to a new folder on your device. No installation is required.

To play the game, you use the direction keys on your device. To exit, click the calendar button (first hardware button). To fire, click the second hardware button. Since I don?t own a real device I?m not sure what the ?name? of these buttons are. But, just give it a go!

The current game is far from ?finished?, but it is safe to run the code and it is playable. The game consists of 4 levels. To add levels of your own, simply make new level XML files and copy them to the game folder on your device. Since I don?t have a level editor yet I would suggest that you build your new level based on the existing one. If you make any fun levels, place share them with us.

Game design
The game consists of one Visual Studio .NET solution called Pocket1945. The project contains 13 classes, 3 interfaces, 1 structure and 7 enumerators. I?ve supplied a screenshot of the class view in VS.NET to illustrate the class design of the game.
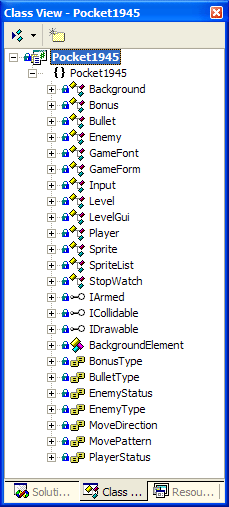
 
The GameForm class is the main class of the application. This class takes care of drawing and running the actual game. The Level class loads a level XML file and parses the XML out to objects. The Background class draws the map and background elements to the screen. The Player class defines the player character in the game. The Enemy class defines all enemy planes used in the game. The Bonus class is used for bonus elements such as an extra life or shield upgrade. The LevelGui class is used to draw a simple in-game user interface. This class is used to display information about health, progress, score and such to the player.

The Input and StopWatch class are taken from one of the MSND articles and gives you access to detected hardware buttons and a high performance counter. These classes are exactly the same as in the MSDN examples.

The IArmed interface is implemented on game objects that can fire bullets and get hit by other bullets. The ICollidable interface is implemented by items that can collide, such as bonus items. The IDrawable interface is implemented by all objects that can be drawn to the screen during the game.

The different enums are used for properties such as type of bonus, weapon, enemy, movement and so on.

Level design
Each level is a XML file containing an ASCII table with the level map and XML nodes for background elements (such as islands), enemies and bonus elements. The Level class takes a path in the constructor and loads the XML file passed into the constructor and builds objects based on the nodes.

The ASCII table contains a table with 8 columns and an unknown number of rows. Each character in the table represents a 32×32 pixel background tile. So if the ASCII table is 56 rows high and 8 columns wide the background size will be 1792×256 pixels. The level file also has a setting called speed which sets the speed in pixels per second. An average map is 1800 pixels high and scroll at 15 pixels per second giving you approximately 2 minutes of game play. An example of the ASCII map:view plaincopy to clipboardprint?

 <Map>  
 <![CDATA[AAAAAAAA  
 BBBBBBBB  
 AAAAAAAA  
 CCCCCCCC  
 CCCCCCCC  
 AAAAAAAA  
 BBBBBBBB  
 BBBCCCBB  
 ABCDABCD]]>  
</Map></P>  
<P>   

The enemy nodes contains all the settings for each enemy. The Y attribute tells the game engine when the enemy comes into play. So, for instance an enemy with Y=1500 starts to move when the player have scrolled to point 1500 on the map. Both enemies and bonus elements as positioned this way. An example enemy node looks something like this:

  <Enemy X="140" Y="1700" Speed="80" MovePattern="1"   
  EnemyType="1" BulletType="1" BulletPower="5" BulletSpeed="150"   
  BulletReloadTime="1000" Power="10" Score="100" />   

X = the horizontal start position for this enemy. 
Y = the vertical start position for this enemy (when it gets focus). 
Speed = the speed the enemy moves at (pixels pr second). 
MovePattern = the way the enemy moves. At the moment straight ahead is the only pattern supported. I?ll add patterns like zigzag, swipe, kamikaze and simple AI. The MovePattern enum defines the different move patterns. 
EnemyType = the type of enemy. There are currently 6 supported enemies. The EnemyType enum defines the different types of enemies. 
BulletType = the type of bulled fired by this enemy. The BulletType enum defines the different types of bullets. 
BulletPower = the power of the bullets fired by this enemy. This indicates how damaged the player gets by a hit. 
BulletSpeed = the speed the bullet is traveling at (pixels per second). 
BulletReloadTime = how long it takes for the enemy to reload (milliseconds). 
Power = how thick the enemy shield is (how hard it is to kill). 
Score = the score you collect by killing this enemy. 
As you probably can guess I?m planning on writing a XML based level designer to build new levels for the game. I?m also thinking about making a XML Web Service based game server where you can upload and download new level sets. The XML format also needs to be formalized by making schemas. This is all on the TODO list.

Bonus elements are implemented almost the same way as enemies so I won?t go into details on the bonus nodes. An example level file can be downloaded here: Level1.xml(zipped)

Points of interests ? Sprite list
One of the things that might be useful to look at is how I?ve implemented sprites. All the game graphics are embedded bitmap resources. At first I only used one single bitmap with all sprites, but I soon realized this would make the file hard to maintain and adding new sprites would cause problems with sprite indexes. I spited the image into logic sections like bullets, enemies, player, tiles, and bonuses.

All sprites are managed by the SpriteList class. The class implements the singleton pattern to ensure that there is only one instance of this class trough out the game. The class consists of one public method called LoadSprites() and several public Bitmap arrays holding each sprite. The LoadSprites() method reads the embedded resources and call a private method called ParseSpriteStrip() that reads a sprite strip (one large bmp with several sprite on it) and splits it into a Bitmap array. Each game object (like a bonus item, a bullet or an enemy) draws it self by reading a bitmap from one of the public Bitmap arrays.

By handling sprites this way you have a consistent way to access your graphical resources. By making the class a singleton you can be sure there is only one instance of the class trough out the application. All loading is done on game initialization making this a fast way to read sprites.

The following code shows the LoadSprites() method and the ParseSpriteStrip() method.

/// <summary>  
/// Metod loading the sprites from the assembly resource files  
/// into the public bitmap array. To be sure the sprites are only loaded  
/// once a private bool is set to true/false indicating if the sprites  
/// have been loaded or not.  
/// </summary>  
public void LoadSprites()  
{  
 if(!doneLoading)  
 {      
  //Accessing the executing assembly to read embeded resources.  
  Assembly asm = Assembly.GetExecutingAssembly();  
    
  //Reads the sprite strip containing the sprites you want to "parse".  
  Bitmap tiles = new Bitmap(asm.GetManifestResourceStream(  
   "Pocket1945.Data.Sprites.Tiles.bmp"));  
  Bitmap bonuses = new Bitmap(asm.GetManifestResourceStream(  
   "Pocket1945.Data.Sprites.Bonuses.bmp"));  
  Bitmap bullets = new Bitmap(asm.GetManifestResourceStream(  
   "Pocket1945.Data.Sprites.Bullets.bmp"));  
  Bitmap smallPlanes = new Bitmap(asm.GetManifestResourceStream(  
   "Pocket1945.Data.Sprites.SmallPlanes.bmp"));  
  Bitmap smallExplotion = new Bitmap(asm.GetManifestResourceStream(  
   "Pocket1945.Data.Sprites.SmallExplotion.bmp"));  
  Bitmap bigBackgroundElements = new Bitmap(asm.GetManifestResourceStream(  
   "Pocket1945.Data.Sprites.BigBackgroundElements.bmp"));  
  Bitmap bigExplotion = new Bitmap(asm.GetManifestResourceStream(  
   "Pocket1945.Data.Sprites.BigExplotion.bmp"));  
  Bitmap bigPlanes = new Bitmap(asm.GetManifestResourceStream(  
   "Pocket1945.Data.Sprites.BigPlanes.bmp"));</P>  
<P>  //Parse the sprite strips into bitmap arrays.  
  Tiles = ParseSpriteStrip(tiles);  
  Bullets = ParseSpriteStrip(bullets);  
  Bonuses = ParseSpriteStrip(bonuses);  
  SmallPlanes = ParseSpriteStrip(smallPlanes);  
  SmallExplotion = ParseSpriteStrip(smallExplotion);  
  BigBackgroundElements = ParseSpriteStrip(bigBackgroundElements);  
  BigExplotion = ParseSpriteStrip(bigExplotion);  
  BigPlanes = ParseSpriteStrip(bigPlanes);</P>  
<P>  //Clean up.  
  tiles.Dispose();  
  bullets.Dispose();  
  bonuses.Dispose();  
  smallPlanes.Dispose();  
  smallExplotion.Dispose();  
  bigBackgroundElements.Dispose();  
  bigExplotion.Dispose();  
  bigPlanes.Dispose();</P>  
<P>  doneLoading = true;  
 }  
}</P>  
<P>/// <summary>  
/// Method parsing a sprite strip into a bitmap array.  
/// </summary>  
/// <param name="destinationArray">  
/// The destination array for the sprites.</param>  
/// <param name="spriteStrip">The sprite strip to   
/// read the sprites from.</param>  
private Bitmap[] ParseSpriteStrip(Bitmap spriteStrip)  
{         
 Rectangle spriteRectangle = new Rectangle(1, 1,   
   spriteStrip.Height - 2, spriteStrip.Height - 2);  
 Bitmap[] destinationArray = new Bitmap[(spriteStrip.Width - 1)   
   / (spriteStrip.Height - 1)];</P>  
<P> //Loop drawing the sprites into the bitmap array.      
 for(int i = 0; i < destinationArray.Length; ++i)  
 {  
  destinationArray[i] = new Bitmap(spriteRectangle.Width, spriteRectangle.Height);  
  Graphics g = Graphics.FromImage(destinationArray[i]);  
  spriteRectangle.X = i * (spriteRectangle.Width + 2) - (i - 1);      
  g.DrawImage(spriteStrip, 0, 0, spriteRectangle, GraphicsUnit.Pixel);      
  g.Dispose();  
 }</P>  
<P> return destinationArray;  
}   

Points of interests ? Double buffering
Another thing worth mentioning is how I draw each game frame. I?m using a common technique called double buffering. Basically what this mean is that I draw the entire frame in memory before moving it onto the screen. By doing this I avoid unwanted flickering. I don?t own a real pocket pc, but I?ve been told that the game performs really well on them. I?m hoping to win a Pocket PC so that I can test this for my self.

The GameForm class (the main class of the game) has three private fields used for drawing:

private Bitmap offScreenBitmap;  
private Graphics offScreenGraphics;   
private Graphcis onScreenGraphics;  

The offScreenBitmap is the bitmap used to hold the in-memory version of each game frame. The offScreenGraphics is a Graphics object used to draw to the in-memory bitmap. onScreenGraphics is a Graphics object used to draw the in-memory bitmap onto the screen at the end of each game loop. All game elements that can be drawn implements the IDrawable interface which has one method called Draw(Graphics g), which is used to draw itself onto the game form. In the game loop you call player.Draw(offScreenGraphic) to make the player draw itself onto the off screen bitmap. Here is an example of the level loop showing how you pass the offScreenGraphcis object to game object and move the offScreenBitmap onto the screen at the end of the loop:

private void DoLevel(string filename)  
{   
 CurrentLevel = new Level(GetFullPath(filename));  
 StopWatch sw = new StopWatch();  
 bool levelCompleted = false;  
 bool displayMenu = false;</P>  
<P> while((playing) && (!levelCompleted))  
 {  
  // Store the tick at which this frame started  
  Int64 startTick = sw.CurrentTick();      
  input.Update();  </P>  
<P>  //Update the rownumber.  
  TickCount++;      
       
  //Draw the background map.       
  CurrentLevel.BackgroundMap.Draw(offScreenGraphics);    </P>  
<P>  //Update bullets, enemies and bonuses.  
  HandleBonuses();  
  HandleBullets();      
  HandleEnemies();    </P>  
<P>  //Update and draw the player.  
  Player.Update(input);   
  Player.Draw(offScreenGraphics);  
  playing = (Player.Status != PlayerStatus.Dead);</P>  
<P>  //Draw in-game user interface  
  levelGui.Draw(offScreenGraphics);  
       
  //Move the offScreenBitmap buffer to the screen.  
  onScreenGraphics.DrawImage(offScreenBitmap, 0, 0,   
   this.ClientRectangle, GraphicsUnit.Pixel);      
    
  //Process all events in the event que.  
  Application.DoEvents();      
 }     
}   

TODO
There are tons of things that need to be done before this can be considered a ?real? fun and exiting game. But, we?re getting there. I won?t go into details of everything that needs to be done, but I?ll add some important points:

A good level editor. 
A set of XML Web Services to upload and downloads levels and post scores. 
New move patterns (how the enemies move). 
A game GUI (main menu, title screen, high score list etc). 
XML Schemas defining the rules for the level files. 
Better designed levels that are well balanced and challenging. 
Bosses. We need big bad bosses. 
Much more. 
Any suggestions are greatly appreciated, either here on Code Project or on the workspace site.

Resources
I?ve used several online resources when building this game. First of all I have to credit Ari Feldman for the great graphics I?ve used in the game. Ari has published several sprite sets on his website under the SpriteLib GPL foil. The sprites can be found on http://www.arifeldman.com/games/spritelib.html.

I would also like to mention everyone on #ms.net on EFNet. Special thanks to ^CareBear for instant feedback on how the game is performing on a real device.

Other resources used are series of game articles published on MSDN:

Writing Mobile Games Using the Microsoft .NET Compact Framework (http://msdn.microsoft.com/mobility/default.aspx?pull=/library/en-us/dnnetcomp/html/netcfgaming.asp). 
Gaming with the .NET Compact Framework (http://msdn.microsoft.com/library/default.asp?url=/library/en-us/dnnetcomp/html/GManGame.asp). 
Gaming with the .NET Compact Framework: A Simple Example (http://msdn.microsoft.com/library/default.asp?url=/library/en-us/dnnetcomp/html/BustThisGame.asp). 
Closing comment
There are still several things I?d like to mention, but in order to get this article/game submitted in time to be a part of the competition I really need to finish it up now.

Part II of this article will be available in X days/months/years/or maybe never. The game is far from finished, but is playable in it’s current state. I hope you download it and give it a go. If you find the project fun and promising I would encourage you to join the workspace up on http://workspaces.gotdotnet.com/pocket1945 and take part of the on-going development of this game. The workspace will also be the place to get your hands on the latest releases of the game.

All comments on this article and the game in general are greatly appreciated.


License
This article has no explicit license attached to it but may contain usage terms in the article text or the download files themselves. If in doubt please contact the author via the discussion board below.

A list of licenses authors might use can be found here

About the Author
Jonas Follesø


Member  I’m a C# developer from Norway. I’m a co-founder of a small ISV called GreIT AS. Our company site can be found at http://www.greit.no (all information in norwegian).

My everyday work consists of building ASP.NET web applications and work on our content management system, Webpakken. I use my spare time on side projects such as Pocket 1945 (http://workspaces.gotdotnet.com/pocket1945), a shooter game for the Pocket PC platform. It’s almost the opposite of my everyday work since games are small, focus on graphics and entertainment, while our CMS is large, focus on businesses and data.

When I’m not sitting in front of the computer I go snowboarding or skateboarding, depending on which time of the year it is.

I also enjoy fly fishing for salmon and trout in the summer. My personal record is a 10.5 KG salmon caught in Lakselva last summer and a 2 KG trout caught some where secret place in Finnmark. A bragging picture of me holding the salmon can be found at http://jonas.greit.no/pictures/salmon.jpg .

I did start blogging some time back, but I haven’t been to good at updating my blogg. I just got so much stuff going on that it’s hard to find time to add blogg posts. You can view my blogg at http://jonas.greit.no, just don’t expect too much.
Occupation:  Web Developer 

Location:   Norway 

C# 윈폼에 올린 브라우저에서 웹페이지 로그인 및 자바스크립트 실행시키기

참조 추가 Microsoft Internet Controls(SHDocVw)와 Microsoft.mshtml 를 하고

using System.Runtime.InteropServices;

using SHDocVw;
using mshtml;

한다.

그 후

InternetExplorer ex = new InternetExplorer();      
ex.Visible = true;
Object obj = null;

ex.Navigate("http://space4u.co.kr", ref obj, ref obj, ref obj, ref obj);

위와 같이 익스플로러를 실행시키고 (space4u.co.kr 로 접속)

굳이 익스플로러가 아니더라도.. WebBrowser를 사용하셔도 됩니다.

private void button3_Click(object sender, EventArgs e)
        {
            IHTMLDocument2 hd;
            hd = (IHTMLDocument2)ex.Document;
            IHTMLElementCollection hCollection = (IHTMLElementCollection)hd.all;
            object obj = "input";                    //input 태그 찾으려고
            IHTMLElementCollection he = (IHTMLElementCollection)hCollection.tags(obj);
            foreach (IHTMLElement helem in he)
            {
                if (helem.getAttribute("name", 0) != null)
                {
                    if (helem.getAttribute("name", 0).ToString() == "email")    //소스를 보고 name속성의 값을 적는다, 아이디 항목
                    {
                        helem.setAttribute("value", (Object)"아이디", 0);       //value 속성에 아이디를 대입
                    }
                    if (helem.getAttribute("name", 0).ToString() == "passwd")
                    {
                        helem.setAttribute("value", (Object)"비밀번호", 0);
                    }
                }
            }
        }

function closeAction(){
alert("종료합니다");
}

function closeActionAA(aa){
alert(aa + "호출");
}

이런 식의 자바스크립트가 있다면,
윈폼에서

this.webBrowser1.Document.InvokeScript("closeAction");
this.webBrowser1.Document.InvokeScript("closeActionAA", new object[] { "하하하"});

이런 식으로 호출할 수 있습니다.

따라서,

this.webBrowser1.Document.InvokeScript("load", new object[] { "code123","3","1","1","1"}); 

요렇게 가능하겠습니다. 


출처 : http://ultragostop.tistory.com/84?srchid=BR1http%3A%2F%2Fultragostop.tistory.com%2F84

IP 범위를 슬레쉬(/)로 계산 or 설정 하는 방법

IP 범위를 설정하는 부분을 보면 가끔 128.112.111.111/13 라고 표시된게 있다. 특정 아이피 뒤에 /숫자를 붙이는 형태죠

이건 도데체 어떻게 계산하는 걸까?

암호같이서 완전 짜증 났었는데 아래 글만 읽으면 쉽게 이해가 됩니다.

비트 마스킹이었더군요. ㅋ…. 비트 개념을 알고 계셔야 이해가 빠릅니다.

홈피에 과다 접속하는 중국/미국/캐나다/프랑스 아이피가 있어서 차단 하려고 보니 흑…. 공부도 하게 되네요.

간단 요약하자면 /뒤에 숫자는 /앞의 IP와 AND 연산하는데 IP 왼쪽부터 /뒤의 숫자만큼 비트를 AND 연산하여 아이피 대역으로 한정하고 숫자와 겹치지 않는 IP의 우측부분을 * 의미합니다.

출처 : http://www.mediawiki.org/wiki/Help:Range_blocks/ko


대역 차단
은 Special:Block에서 특정 대역의 IP 주소를 모두 차단할 수 있는 방법입니다.
대역 차단 기능은 일반적인 IP 차단과 동일하게 사용할 수 있으며, ‘익명 사용자만 차단하기’를 선택하지 않을 경우 그 대역을 사용하는 사용자는 로그인을 했을 경우에도 활동이 제한됩니다.

위키미디어에서 운영하는 모든 위키에서는 대역 차단 기능을 사용할 수 있고, 직접 운영하는 미디어위키에서 대역 차단 기능을 사용하려면 LocalSettings.php에 다음 코드를 추가해주면 됩니다.

$wgSysopRangeBans = true;

대역 차단 기능은 CIDR 표기법을 이용하며, 이 기능을 정확하게 이해하지 못한 채 사용할 경우 엉뚱한 IP 대역을 막을 수 있으므로 주의해야 합니다.

Contents

기술적 정보

CIDR 표기법은 IP 주소, 슬래시(/), CIDR 접미사로 이루어져 있고, 여기에서 CIDR 접미사는 IP 주소들을 2진법으로 나타냈을 때 공통되는 부분의 길이를 의미합니다. 예를 들어, CIDR 표기법에 의하면 IPv4 주소 범위는 “10.2.3.41/24“, IPv6 주소 범위는 “a3:b:c1:d:e:f:1:21/24“으로 표시됩니다.

CIDR 접미사에 대해 더 자세히 설명하면, 예를 들어 “10.10.1.32” 를 2진법으로 표현하면 “00001010.00001010.00000001.00100000“가 됩니다. 10.10.1.32/27에 포함되는 주소는 10.10.1.32(“00001010.00001010.00000001.00100000“)와 앞쪽의 27자리가 같은 주소들(“00001010.00001010.00000001.001?????“), 즉 10.10.1.32~10.10.1.63가 모두 해당됩니다.

CIDR 접미사는 값이 클수록 IP 범위가 줄어듭니다. 또한 이 값은 IPv4와 IPv6에서 서로 다르므로 사용할 때 주의해야 합니다. 실제 사용할 때에는 아래의 #범위표를 참고해주세요.

범위표

아래의 표는 각각의 CIDR 접미사와 그에 해당하는 IP대역을 보여줍니다. 미디어위키 차단 기능에서는 IPv4, CIDR 접미사 16~32에서의 대역 차단만을 허용하고 있습니다.

CIDR시작범위종료범위전체주소IP주소에서 선택된 비트
69.208.0.0/00.0.0.0255.255.255.2554,294,967,296********.********.********.********
69.208.0.0/10.0.0.0127.255.255.2552,147,483,6480*******.********.********.********
69.208.0.0/465.0.0.079.255.255.255268,435,4560100****.********.********.********
69.208.0.0/869.0.0.069.255.255.25567,108,86401000101.********.********.********
69.208.0.0/1169.208.0.069.238.255.2552,197,15201000101.110*****.********.********
69.208.0.0/1269.208.0.069.223.255.2551,048,57601000101.1101****.********.********
69.208.0.0/1369.208.0.069.215.255.255524,28801000101.11010***.********.********
69.208.0.0/1469.208.0.069.211.255.255262,14401000101.110100**.********.********
69.208.0.0/1569.208.0.069.209.255.255131,07201000101.1101000*.********.********
69.208.0.0/1669.208.0.069.208.255.25565,53601000101.11010000.********.********
69.208.0.0/1769.208.0.069.208.127.25532,76801000101.11010000.0*******.********
69.208.0.0/1869.208.0.069.208.63.25516,38401000101.11010000.00******.********
69.208.0.0/1969.208.0.069.208.31.2558,19201000101.11010000.000*****.********
69.208.0.0/2069.208.0.069.208.15.2554,09601000101.11010000.0000****.********
69.208.0.0/2169.208.0.069.208.7.2552,04801000101.11010000.00000***.********
69.208.0.0/2269.208.0.069.208.3.2551,02401000101.11010000.000000**.********
69.208.0.0/2369.208.0.069.208.1.25551201000101.11010000.0000000*.********
69.208.0.0/2469.208.0.069.208.0.25525601000101.11010000.00000000.********
69.208.0.0/2569.208.0.069.208.0.12712801000101.11010000.00000000.0*******
69.208.0.0/2669.208.0.069.208.0.636401000101.11010000.00000000.00******
69.208.0.0/2769.208.0.069.208.0.313201000101.11010000.00000000.000*****
69.208.0.0/2869.208.0.069.208.0.151601000101.11010000.00000000.0000****
69.208.0.0/2969.208.0.069.208.0.7801000101.11010000.00000000.00000***
69.208.0.0/3069.208.0.069.208.0.3401000101.11010000.00000000.000000**
69.208.0.0/3169.208.0.069.208.0.1201000101.11010000.00000000.0000000*
69.208.0.0/3269.208.0.069.208.0.0101000101.11010000.00000000.00000000

[호스팅 구축] DDos 방어

아래 글을 보고 인터넷에서 찾아 보았습니다

설정하는 것은 간단하나 배경 지식이 방대하다 보니 내용이 긴거 같네요 그래도 보안 설정을 직접해야 하는 위치에 있다면 한번쯤 시간내서 읽어 보는 것이 좋을거 같아 퍼왔어요..

원본 링크 : http://ihelpers.x2soft.co.kr/programming/tipntech.php?CMD=view&IDX=350&source=overture#wf

TCP SYN_Flooding 공격의 원인과 해결책 


오늘과 내일 넷센터 홍석범(antihong@tt.co.kr) 


최 근 자신이 운영하는 서버에 특별히 부하가 걸리거나 이상이 있는 것도 아니고 
또 데몬도 정상적으로 떠 있는데, 정작 서비스가 작동하지 않는 경우가 종종 있다.
이러한 경우에는 해당 데몬을 완전히 멈추었다가 살리면 다시 작동하는데, 
잠시 후에 확인해 보면 똑같은 현상이 다시 나타나곤 한다.
혹시 프로그램을 잘못 설치했나 싶어 지우고 다시 설치해도 마찬가지이다. 

만 약 최근 들어 이러한 경험이 있다면 이는 최근 유행하는 DoS(서비스 거부 공격)의 일종인 
TCP SYN Flooding 공격을 당했을 가능성이 크다.

SYN Flooding 공격의 개념이 소개된지는 꽤 되었지만 최근 들어 리눅스가 확산되고, 간단하게 실행할 수 있는 공격 소스가 광범위하게 배포되면서 이 공격이 자주 확인되고 있고, 이로 인해 그 피해가 급속히 확산되고 있다. 실제로 현재 가장 많이 사용되고 있는 배포판인 레드햇 6.X 계열에 이 공격을 실행하기만 하면 단 몇 초만에 서비스가 정지해 버리게 된다.

따라서 피해가 확산되고 있는 이 공격의 원리와 대처방법에 대해 알아보도록 하자.


“TCP 의 약점을 이용한 공격원리”

SYN Flooding 공격은 TCP 의 취약점을 이용한 공격의 형태이므로 먼저 TCP 에 대해 
알아야 한다. TCP 는 Transmition Control Protocol 의 약자로 UDP와는 달리 신뢰성 있는 연결을 담당한다. 따라서 서버와 클라이언트간에 본격적인 통신이 이루어지기 전에는 
다음 그림과 같이 소위 "3 Way handshaking" 이라는 정해진 규칙이 사전에 선행되어야 한다.


1단계. A 클라이언트는 B 서버에 접속을 요청하는 SYN 패킷을 보낸다.
2단계. B 서버는 요청을 받고 A 클라이언트에게 요청을 수락한다는 SYN 패킷과 
ACK 패킷을 발송한다. 
3단계. A 클라이언트는 B 서버에게 ACK 를 보내고 이후로부터 연결이 이루어지고 
본격적으로 데이터가 교환된다.

이것이 TCP 의 기본적인 Flow 이다.
그런데, 이 그림에서 악의적인 공격자가 1단계만 요청(SYN)하고 B서버로부터 응답을 받은 후(SYN+ACK) 3단계, 즉 클라이언트에게 ACK를 보내지 않는다면 어떻게 될까?
SYN+ACK 패킷을 받은 B 호스트는 A 로부터 응답이 올 것을 기대하고 반쯤 열린 
이른바 “Half Open” 상태가 되어 대기 상태에 머무른 후 일정 시간(75초) 후에 다음 요청이 오지 않으면 해당 연결을 초기화 하게 되는데, 초기화하기 전까지 이 연결은 메모리 공간인 백로그큐(Backlog Queue)에 계속 쌓이게 된다. 

그런데, 이 위조된 연결 시도를 초기화하기 전에 위조된 새로운 요구가 계속 들어오게 된다면 또한 위조된 새로운 요구가 연결을 초기화하는 속도보다 더 빨리 이루어진다면 어떻게 될까? 이러한 경우 SYN 패킷이 어느 정도 백로그큐에 저장이 되다 결국 꽉차게 되어 더 이상의 연결을 받아들일 수 없는 상태, 즉 서비스 거부 상태로 들어가게 되는 것이다. 이처럼 백로그큐가 가득 찼을 경우에 공격을 당한 해당 포트로만 접속이 이루어지지 않을 뿐 다른 포트에는 영향을 주지 않고, 또한 서버에 별다른 부하도 유발하지 않으므로 관리자가 잘 모르는 경우가 많다. 또한 다른 DoS 공격과는 달리 많은 트래픽을 유발하는 공격이 아니므로 쉽게 파악이 되지 않는 공격 형태이다.

그렇다면 이 공격을 당하고 있는지 여부는 어떻게 알 수 있을까?
시스템에 로긴후 "netstat" 이라는 명령으로 확인 가능하다.


“그 럼, 어떻게 파악하는가?”


netstat 은 시스템의 각종 네트워크 정보를 알려주는 명령어로 네트워크 연결, 라우팅 현황, 인터페이스 통계등의 정보를 확인할 수 있게 해 준다. 여기서 잠깐 netstat 으로 나오는 연결 상태에 대해 알아보자.
netstat -na 로 확인해 보면 Local Address, Foreign Address, State 등의 정보가 출력되는데,
이 중 State 부분에 보이는 메시지를 주목하면 된다.

### 참고 : State 부분에 가능한 연결상태 ###################################
LISTEN : 서버의 데몬이 떠서 접속 요청을 기다리는 상태
SYS-SENT : 로컬의 클라이언트 어플리케이션이 원격 호스트에 연결을 요청한 상태
SYN_RECEIVED : 서버가 원격 클라이언트로부터 접속 요구를 받아 클라이언트에게
응답을 하였지만 아직 클라이언트에게 확인 메시지는 받지 않은 상태
ESTABLISHED : 3 Way-Handshaking 이 완료된 후 서로 연결된 상태
FIN-WAIT1 , CLOSE-WAIT , FIN-WAIT2 : 
서버에서 연결을 종료하기 위해 클라이언트에게 종결을 요청하고 
회신을 받아 종료하는 과정의 상태
CLOSING : 흔하지 않지만 주로 확인 메시지가 전송도중 분실된 상태
TIME-WAIT : 연결은 종료되었지만 분실되었을지 모를 느린 세그먼트를 위해 
당분간 소켓을 열어놓은 상태
CLOSED : 완전히 종료 
################################################################################


각각의 연결 상태는 통신 상황에 따라 매우 복잡하게 순간적으로 변화하는데, 
이 중 주로 주목하여야 할 상태는 SYN_RECEIVED 이다. 설명에 나온 대로 이 상태는 
클라이언트의 확인 메시지를 기다리는 상태이지만 특별히 전용 회선에 장애가 없는 한 이 과정은 순간적으로 일어나므로 실제 netstat 으로 확인되는 경우는 거의 없다.
따라서 netstat -na|grep SYN_RECV 로 확인해 보아 많은 메시지가 보인다면 
Syn Flooding 공격을 당하고 있는 것으로 판단하면 된다.


“실제 테스트 공격으로 직접 확인해 보자!!” 


실제 자신의 시스템이 얼마나 취약한지 자신의 시스템에 테스트해 보도록 하자.
노파심에 이야기하는 것이지만 이 공격은 반드시 자신의 시스템에서만 테스트 용도로 실행해 보기 바란다. 이 공격 소스는 인터넷상에서 쉽게 찾을 수 있다.
http://packetstorm.securify.com/나 http://rootshell.com/에 접속후 syn 으로 검색해 보면 많은 소스와 문서가 있는데, 이중 관련 파일을 다운로드받아 설치해 보면 된다.

소 스에 따라 실행 방법이 다르지만 다운로드 받은 소스파일이 syn_floodinbg_dos.c 라면 gcc ?o syn_flooding_dos syn_flooding_dos.c 로 컴파일을 한다. 이후 
"./syn_flooding_dos 소IP 공격지IP 공격할하위포트번호 상위포트번호" 와 같이 실행하면 되는데, 필자는 ./syn_flodding_dos 0 localhost 80 80 과 같이 테스트해 보았다.

위 명령어의 의미는 공격지 주소를 랜덤하게 무작위 IP주소로 설정(0) 하여 localhost 서버의 80 번 포트에 Syn_Flooding 공격을 한다는 내용이다.

실제 본인이 테스트한 레드햇 6.2 서버에서는 공격후 2-3초만에 웹서비스가 중지되었다.
테 스트 공격 후 telnet localhost 80 으로 접속해 보기 바란다.
분명히 httpd 데몬은 떠 있는데, 접속이 되지 않을 것이다.

아래는 공격을 당한 서버에서 netstat -na|grep SYN 으로 SYN 패킷을 잡은 부분이다.


분명히 localhost 에서 공격을 했음에도 위 그림에서처럼 80번 포트로 SYN 패킷을 요청한 IP주소는 랜덤하게 보이고 있어 도무지 어떤 IP 에서 공격하고 있는 것인지 알 수 없다. 실제로 공격지 IP 를 확인해 보면 대부분이 현재 인터넷상에 연결되지 않은 존재하지 않는 위조된 IP들이다.

실제 공격 소스 코드중 소스 IP를 생성하는 부분을 보면 아래와 같이 0부터 255까지 
임의의 값을 뽑아 IP 주소로 설정하는 것을 확인할 수 있다.

{
a = getrandom(0, 255);
b = getrandom(0, 255);
c = getrandom(0, 255);
d = getrandom(0, 255);
sprintf(junk, "%i.%i.%i.%i", a, b, c, d);
me_fake = getaddr(junk);
}


SYN_Flooding 공격에 대한 대비 및 해결책 

그렇다면 이 공격에 대해 어떻게 대비하여야 할까?

1. 백로그 큐를 늘려준다. 

직 관적으로 보았을 때 서비스 거부에 돌입하게 되는 것은 백로그큐(Backlog Queue)가 가득 
차서 다른 접속 요구를 받아들이지 못하기 때문이므로 백로그 큐의 크기를 늘려주면 될 것이다. 실제로 리눅스를 포함해서 많은 운영체제들의 백로그큐값을 조사해 보면 이 값이 필요 이상으로 작게 설정되어 있어 적절히 늘려주는 것이 좋다.
현재 시스템에 설정된 백로그큐의 크기는 

[root@net /root]# sysctl -a|grep syn_backlog
net.ipv4.tcp_max_syn_backlog = 128 

또는 
[root@net /root]# cat /proc/sys/net/ipv4/tcp_max_syn_backlog
128 
로 확인가능하며 128kb 인 것을 확인할 수 있다.

일반적으로 시스템의 RAM 이 128M 일 경우에는 128 을 설정하고 그 이상일 경우에는 1024 정도로 설정해 주는 것이 좋다. 이 때 주의할 점은 이 값을 무작정 크게 설정한다고 좋은 것은 아니며 1024 이상으로 설정할 경우는 /usr/src/linux/include/net/tcp.h 소스에서 TCP_SYNQ_SIZE 변수를 수정 후 커널을 재컴파일하여야 한다. 이 변수를 설정시 TCP_SYNQ_HSIZE에 16을 곱한 값이 tcp_max_syn_backlog 보다는 작거나 같아야 하는데, 그렇지 않을 경우에는 시스템에 문제가 발생할 수 있으니 1024 보다 높은 값으로 설정하지 말기 바란다. 그리고 이 값을 너무 크게 설정하였을 경우에는 경험적으로 아래 설명할 syncookies 기능이 잘 적용되지 않는 현상이 가끔 확인되었다. 
이와는 별개로 시스템의 부하가 많이 걸릴 경우에도 백로그큐를 늘려주면 일정 정도의 효과를 볼 수 있는 것으로 알려져 있다. 

백로그큐의 값을 설정하는 방법은 다음과 같다.

[root@net /root]# sysctl -w net.ipv4.tcp_max_syn_backlog=1024
또는 
[root@net /root]# echo 1024 > /proc/sys/net/ipv4/tcp_max_syn_backlog
로 해도 된다. 

그러나 이 방법은 임시적인 대책일 뿐, 지속적으로 많은 TCP SYN Flooding 공격을 당할 때는 결국 백로크큐가 가득 차게 되므로 근본적인 해결 방안은 아니다.

2. syncookies 기능을 켠다.

Syncookies(“신 쿠키” 라고 발음한다.) 는 "Three-way handshake" 진행 과정을 다소 변경하는 것으로 Alex Yuriev 와 Avi Freedman 에 의해 제안되었는데, TCP header 의 특정한 부분을 뽑아내어 암호화 알고리즘을 이용하는 방식으로 Three-way Handshake 가 성공적으로 이루어지지 않으면 더 이상 소스 경로를 거슬러 올라가지 않는다. 따라서 적절한 연결 요청에 대해서만 연결을 맺기 위해 리소스를 소비하게 되는 것이다. 

syncookies 기능은 TCP_Syn_Flooding 공격을 차단하기 위한 가장 확실한 방법으로 이 기능을 이용하려면 일단 커널 컴파일 옵션에서 CONFIG_SYN_COOKIES이 Y 로 선택되어 있어야 한다.

자신의 커널 옵션에 이 기능이 설정되어 있는지 확인하려면 
/usr/src/linux 디렉토리로 이동후 make menuconfig 후 
Networking options ---> 
[*] IP: TCP syncookie support (disabled per default) 
와 같이 확인하면 된다.

만약 설정이 되어 있지 않다면 선택 후 커널 컴파일을 다시 하여야 하지만 대부분 배포판은 기본적으로 이 옵션이 선택되어 있으므로 걱정할 필요는 없다.
그러나 위와 같이 커널 옵션에 설정되어 있다 하더라도 실제 syncookies 적용은 꺼져 있으므로 이 값을 다음과 같은 방법으로 활성화해야 한다.

[root@control src]# sysctl -a|grep syncookie
net.ipv4.tcp_syncookies = 0 

0 으로 설정되어 있으므로 현재 syncookies는 적용되지 않는다. 
따라서 아래와 같이 1을 설정하여 syncookies 기능을 활성화하도록 한다. 

[root@control src]# sysctl -w net.ipv4.tcp_syncookies=1

syncookies는 백로그큐가 가득 찼을 경우에도 정상적인 접속 요구를 계속 받아들일 수 있도록 해 주므로 SYN_Flooding 공격에 대비한 가장 효과적인 방법중 하나이다.
만약 공격을 당해 syncookies 가 작동할 때에는 /var/log/messages 파일에 아래와 같이 SynFlooding 공격이 진행중이라는 메시지가 출력된다.

Jun 11 18:54:08 net kernel: possible SYN flooding on port 80. Sending cookies.

SYN_Flooding 공격이 지속적으로 매우 심하게 진행중일 때에는 syncookies 기능이 작동한다 하더라도 네트워크가 다운되는 현상이 가끔 확인되었다. 따라서 syncookies 기능 외에 몇 가지 설정도 함께 적용하는 것이 시스템의 안정성을 위해 권장하는 방법이다. 아울러 네트워크가 다운되었을 경우에는 /etc/rc.d/init.d/network restart 로 network 를 재설정해 보거나 reboot 를 하여야 한다. 


3. 기타 시스템의 네트워크 설정을 최적화한다.

아래 설정은 비단 TCP Syn_Flooding 공격뿐만이 아니라 다른 여타 DoS 공격에도 효과적이으로 방어하므로 적절히 설정할 것을 권장한다.

sysctl -w net.ipv4.icmp_destunreach_rate=1
# 1/100초 동안 받아들일 수 있는 "dest unreach (type 3) icmp" 의 개수

sysctl -w net.ipv4.icmp_echo_ignore_broadcasts=1 
# Broadcast 로부터 오는 ping 을 차단함. (Smurf 공격을 차단함)

sysctl -w net.ipv4.icmp_echoreply_rate=1 
# 1/100초에 반응하는 ping 의 최대 숫자

sysctl -w net.ipv4.icmp_echo_ignore_all=1 
#모든 ping 을 차단함

sysctl -w net.ipv4.icmp_ignore_bogus_error_responses=1 
# IP 나 TCP 헤더가 깨진 bad icmp packet을 무시한다.

sysctl -w net.ipv4.icmp_paramprob_rate=1 
# 1/100 초에 받아들이는 param probe packets의 수

sysctl -w net.ipv4.icmp_timeexceed_rate=1 
# 1/100 초에 받아들이는 timeexceed 패킷의 수(traceroute 와 관련)

sysctl -w net.ipv4.igmp_max_memberships=1 
# 1/100 초에 받아들이는 igmp "memberships" 의 수 

sysctl -w net.ipv4.ip_always_defrag=0 
# 항상 패킷 조각 모음을 하지 않는다. 

sysctl -w net.ipv4.ip_default_ttl=64 
# 매우 복잡한 사이트에서는 이 값을 늘리는 것도 가능하지만 
# 64로 두는 것이 적당하며 더 늘렸을 경우에는 큰 문제가 발생할 수도 있다.

sysctl -w net.ipv4.ip_forward=0 
# 게이트웨이 서버가 아닌 이상 패킷을 포워딩 할 필요는 없다.

sysctl -w net.ipv4.ipfrag_time=15 
# fragmented packet이 메모리에 존재하는 시간을 15초로 설정한다.

sysctl -w net.ipv4.tcp_syn_retries=3 
# 일정한 시간과 IP 별로 보내고 받는 SYN 재시도 횟수를 3회로 제한한다.
# 이 옵션은 스푸핑된(위조된) 주소로 오는 SYN 연결의 양을 줄여준다. 
# 기본값은 5이며 255를 넘지 않아야 한다. 

sysctl -w net.ipv4.tcp_retries1=3 
# 무언가 문제가 있을 때 연결을 위해 재시도 할 횟수. 최소값과 기본값은 3이다.

sysctl -w net.ipv4.tcp_retries2=7 
# TCP 연결을 끊기 전에 재시도할 횟수.

sysctl -w net.ipv4.conf.eth0.rp_filter=2
sysctl -w net.ipv4.conf.lo.rp_filter=2
susctl -w net.ipv4.conf.default.rp_filter=2
sysctl -w net.ipv4.conf.all.rp_filter=2
# 이 설정은 자신의 네트워크가 스푸핑된 공격지의 소스로 쓰이는 것을 차단한다.
# 모든 인터페이스에서 들어오는 패킷에 대해 reply를 하여 들어오는 인터페이스로 나가지 
# 못하는 패킷을 거부한다. 

sysctl -w net.ipv4.conf.eth0.accept_redirects=0
sysctl -w net.ipv4.conf.lo.accept_redirects=0
sysctl -w net.ipv4.conf.default.accept_redirects=0
sysctl -w net.ipv4.conf.all.accept_redirects=0
# icmp redirects 를 허용하지 않는다.
# 만약 ICMP Redirect 를 허용할 경우에는 공격자가 임의의 라우팅 테이블을 변경할 수
# 있게 되어 자신이 의도하지 않는 경로, 즉 공격자가 의도한 경로로 트래픽이 전달될 수 
# 있는 위험이 있다.

sysctl -w net.ipv4.conf.eth0.accept_source_route=0
sysctl -w net.ipv4.conf.lo.accept_source_route=0
sysctl -w net.ipv4.conf.default.accept_source_route=0
sysctl -w net.ipv4.conf.all.accept_source_route=0
# 스푸핑을 막기 위해 source route 패킷을 허용하지 않는다.
# 소스 라우팅을 허용할 경우 악의적인 공격자가 IP 소스 라우팅을 사용해서 목적지의 경로# 를 지정할 수도 있고, 원래 위치로 돌아오는 경로도 지정할 수 있다. 
# 이러한 소스 라우팅이 가능한 것을 이용해 공격자가 마치 신뢰받는 호스트나
# 클라이언트인것 처럼 위장할 수 있는 것이다.


sysctl -w net.ipv4.conf.eth0.bootp_relay=0
sysctl -w net.ipv4.conf.lo.bootp_relay=0
sysctl -w net.ipv4.conf.default.bootp_relay=0
sysctl -w net.ipv4.conf.all.bootp_relay=0
# bootp 패킷을 허용하지 않는다. 

sysctl -w net.ipv4.conf.eth0.log_martians=1
sysctl -w net.ipv4.conf.lo.log_martians=1
sysctl -w net.ipv4.conf.default.log_martians=1
sysctl -w net.ipv4.conf.all.log_martians=1
# 스푸핑된 패킷이나 소스라우팅, Redirect 패킷에 대해 로그파일에 정보를 남긴다.

sysctl -w net.ipv4.conf.eth0.secure_redirects=0
sysctl -w net.ipv4.conf.lo.secure_redirects=0
sysctl -w net.ipv4.conf.default.secure_redirects=0
sysctl -w net.ipv4.conf.all.secure_redirects=0
# 게이트웨이로부터의 redirect 를 허용하지 않음으로써 스푸핑을 막기 위해 설정한다.

sysctl -w net.ipv4.conf.eth0.send_redirects=0
sysctl -w net.ipv4.conf.lo.send_redirects=0
sysctl -w net.ipv4.conf.default.send_redirects=0
sysctl -w net.ipv4.conf.all.send_redirects=0
# icmp redirects 를 보내지 않는다.

sysctl -w net.ipv4.conf.eth0.proxy_arp=0
sysctl -w net.ipv4.conf.lo.proxy_arp=0
sysctl -w net.ipv4.conf.default.proxy_arp=0
sysctl -w net.ipv4.conf.all.proxy_arp=0
# proxy arp 를 설정하지 않는다. 이 값이 1로 설정되었을 경우 proxy_arp 가 설정된 인터페
# 이스에 대해 arp 질의가 들어왔을 때 모든 인터페이스가 반응하게 된다.

sysctl -w net.ipv4.tcp_keepalive_time=30
# 이미 프로세스가 종료되어 불필요하게 남아 있는 연결을 끊는 시간을 줄이도록 한다.

sysctl -w net.ipv4.tcp_fin_timeout=30
# 연결을 종료시 소요되는 시간을 줄여준다. (기본 설정값 : 60)

sysctl -w net.ipv4.tcp_tw_buckets=720000 
# 동시에 유지 가능한 timewait 소켓의 수이다. 만약 지정된 숫자를 초과하였을 경우에는
# timewait 소켓이 없어지며 경고 메시지가 출력된다. 이 제한은 단순한 DoS 공격을 차단하
# 기 위해 존재하는데, 임의로 이 값을 줄여서는 안 되며 메모리가 충분하다면 적절하게 늘
# 려주는 것이 좋은데, 64M 마다 180000 으로 설정하면 된다. 따라서 256M 일 경우에는 
# 256/4=4 4*180000=720000 을 적용하면 된다. 

sysctl -w net.ipv4.tcp_keepalive_probes=2
sysctl -w net.ipv4.tcp_max_ka_probes=100
# 간단한 DoS 공격을 막아준다.

위의 모든 설정은 재부팅 후에 원래의 값으로 다시 초기화되므로 /etc/rc.d/rc.local 에 두어 부팅시마다 실행하도록 하여야 한다. 그리고 리눅스의 버전이 낮아 sysctl 명령어가 없는 경우에는 
echo 0 or 1 > /proc/sys/net/* 와 같이 직접 /proc 이하의 값을 직접 설정해 주어도 된다.
echo 명령어 역시 재부팅되면 초기화되므로 /etc/rc.d/rc.local 에 설정해 두어야 재부팅후에도 적용이 된다. 
아울러 레드햇 6.2 이상일 경우에는 /etc/sysctl.conf 파일에 net.ipv4.tcp_syncookies=1 와 같이 설정한 후 network 를 restart 하는 방법도 있다.


4. 그외 SYN_Flooding 에 대한 보충 설명 몇 가지 


(1) 위에서 설명한 방법 외에 추가적으로 설정할 만한 몇 가지 방법이 있다.
RFC 1918 에 의해 내부(Private) IP를 소스로 들어오는 트래픽을 차단한다.
127.0.0.0, 10.0.0.0, 172.16.0.0, 192.168.0.0 등은 Private IP 로서 내부의 가상 IP 를 사용할 때 쓰이는 주소이며 일반적으로 이러한 IP를 소스 주소로 라우팅이 될 수 없다. 
따라서 아래와 같이 비정상적인 IP 주소를 소스로 해서 들어오는 트래픽을 차단한다.

iptables -A INPUT -s 10.0.0./8 -j DROP
iptables -A INPUT -s 172.16.0.0/12 -j DROP
iptables -A INPUT -s 192.168.0.0/16 -j DROP 
# 사설 IP 를 차단한다.
# /8, /16 등은 CIDR 라 하며 /8 은 A Class, /16 은 B Class 를 뜻한다.

iptables -A INPUT -s 255.255.255.255/32 -j DROP
iptables -A INPUT -s 127.0.0.0/8 -j DROP
# 일반적으로 라우팅이 되지 않는 IP 대역을 차단한다.

iptables -A INPUT -s 240.0.0.0/5 -j DROP
# IANA 에 예약된 주소를 차단한다.

iptables -A INPUT -s 211.2.3.4 -j DROP
# 아울러 자기 자신의 IP 를 소스로 하는 패킷도 필터링한다.(211.2.3.4 대신 자신의 IP입력)
# 자신의 IP 를 소스로 해서 패킷이 들어올 수는 없다.

자 신의 시스템이 Kernel 2.4 이전 버전의 경우에는 iptables 대신 ipchains 를 사용하므로 
ipchains -A input -s 10.0.0./8 -j DENY 와 같은 방법으로 사용하면 된다.
만약 iptables 가 설치되어 있지 않으면 http://netfilter.kernelnotes.org/ 에 접속 후 최신 버전의 iptables.tar 를 다운로드 받아 압축해제 후 make; make install 로 설치하면 된다. 
현 재 리눅스 시스템의 Kernel 버전은 uname ?r 을 입력하면 확인할 수 있다.
아울러 아래는 네트워크를 통해 라우팅 될 수 없는 IP 대역이므로 필터링 하여야 할 IP 이다.

0.0.0.0/8 - Historical Broadcast
10.0.0.0/8 - RFC 1918 에 의한 내부 네트워크 
127.0.0.0/8 - Loopback
169.254.0.0/16 - Link Local Networks
172.16.0.0/12 - RFC 1918 에 의한 내부 네트워크
192.0.2.0/24 - TEST-NET
192.168.0.0/16 - RFC 1918에 의한 내부 네트워크 
224.0.0.0/4 - Multicast D Class 
240.0.0.0/5 - 예약된 E Class 
248.0.0.0/5 - 미할당 
255.255.255.255/32 - 브로드캐스트 

(2) 임의의 IP 가 아닌 특정한 IP를 소스 주소로 계속적으로 SYN 공격이 이루어 질 경우에는 해당 IP 를 차단하는 것도 좋은 방법이다. 
만약 211.2.3.4 에서 지속적으로 공격이 들어올 때는 아래와 같이 차단할 수 있다.

iptables -A INPUT -s 211.2.3.4 -j DROP (Kernel 2.4.x 버전)
ipchains -A input -s 211.2.3.4 -j DENY (Kernel 2.4 이전 버전)

또는 
route add -host 211.2.3.4 reject 로 한다.
만약 211.2.3.X 대역 전체를 차단하려면 211.2.3.0/24 와 같이 하면 된다.
(/24 는 C Class 를 뜻한다.)
그러나 위와 같이 route 보다는 iptables 나 ipchains 로 차단하는 것이 더 효과적이다.

만약 임의의 IP로 공격지를 생성한다면 SYN_RECEIVED 로 보이는 IP 중에는 실제 네트워크에 연결되어 있는 IP 도 있을 것이고 그렇지 않은 IP 도 있을 것이다. 그러나 실제 공격을 당할 때 공격지 IP 를 검출해 보면 모두 ping 이 되지 않는 실제 네트워크에 연결되지 않은 IP 주소이다. 어째서 이런 현상이 일어날까? 이는 앞에서 설명한 TCP 의 3 Way-Handshake 원리를 잘 생각해보면 이해가 될 것이다.
즉, 무작위로 생성된 IP 를 소스로 한 SYN 패킷을 받은 서버는, 요청을 받은 모든 IP 로 SYN+ACK 패킷을 보낸다. 그런데, 정작 실제로 해당 IP 를 사용중인 호스트는 SYN 패킷을 보내지도 않았는데, 공격을 받은 서버로부터 영문도 모르는 SYN+ACK 를 받았으므로 이 패킷을 비정상적인 패킷으로 간주하고 해당 패킷을 리셋(RST)하여 초기화 시킨다. 
그 리고 실제 존재하지 않는 IP 에 대해서 알아보자. 공격을 당한 서버가 해당 IP로부터 SYN 패킷을 받았다고 판단(실제로는 위조된 패킷이지만) 하여 SYN+ACK 패킷을 발송 후 ACK 패킷을 계속 기다리지만 해당 IP 는 인터넷에 연결되어 있지 않으므로 SYN+ACK 패킷을 받을 수도 없을 뿐더러 이에 대한 응답으로 ACK 패킷을 발송하지 않을 것임은 불을 보듯 뻔한 것이고, 결국 공격을 받는 서버는 존재하지도 않는 IP 로부터 ACK 패킷을 받을 것만을 기다리며 백로그큐는 가득 차게 되는 것이다. 이것이 백로그큐가 가득 차게 되는 이유이며 백로그큐를 가득 채우는 IP가 모두 실제로는 존재하지 않는 IP 들인 것이다. 따라서 공격자의 입장에서는 인터넷상에서 라우팅이 되지 않는 IP 를 소스 IP 로 하여 공격하는 것이 가장 효과적일 것이다. 즉 인터넷에 연결되어 있는 IP 를 소스 주소로 하여 SYN Flooding 공격하는 것은 의미가 없다. 


(3) 실제 공격지 IP를 추적하는 것은 거의 불가능하다.
대부분의 DoS 공격이 그러하듯이 SYN_Flooding 공격도 소스IP를 속여서 들어오기 때문에 netstat 으로 보이는 IP를 실제 공격지 IP 라고 판단해서 해당 IP로 역공격을 해서는 안 된다. 공격을 당하는 리눅스 서버에서 공격지를 아는 방법은 없으며 상위 라우터와 해당 라우터가 연결되어 있는 ISP 업체와 긴밀하게 협조가 되었을 때라야 그나마 추척이 가능하다.
그러나 사실상 협조가 이루어져도 추척하기란 매우 어려운데, 만약 라우팅 경로가 20개이상 되는 곳에서 공격한다면 20개 라우터를 관리하는 모든 관리자와 동시에 협조가 이루어져야하고 공격이 실제 이루어지고 있는 당시에 추척이 되어야 하므로 매우 어렵다고 할 수 있다. 결론적으로 공격지 IP 를 추척하는 것은 불가능하다고 할 수 있다. 
그리고, 참고적으로 시스템에서 위조된 패킷을 생성하는 것은 오직 root 만이 가능하므로 공격자는 공격지 시스템의 root 소유로 SYN Flooding 공격을 하는 것이라는 사실을 참고하기 바란다. 


(4) Virtul-Sever 커널 패치를 하는 방법도 있다.
이 커널 패치를 하였을 경우에는 몇 가지 DoS 공격을 차단할 수 있다. VirtualServer란 말 그대로 로드 밸랜싱등의 클러스터링 시스템을 구성할 때 필요한 커널 패치로서 패치를 한 후 sysctl -a|grep .vs. 로 확인해 보면 몇 가지 설정이 추가된 것을 확인할 수 있다. 
이 방법에 대한 보다 자세한 안내는 http://www.linuxvirtualserver.org/defense.html를 참고하기 바란다. 

(5) 라우터나 방화벽에서 차단 가능하다.
라우터등 네트워크 장비로 유명한 CISCO 에서는 TCP SYN_Flooding 공격을 차단하기 위해 TCP Intercept 라는 솔루션을 제안했다. TCP Intercept 는 두 가지 방식으로 구현가능한데 , 첫번째 방식은 “인터셉트 모드” 라 하여 말 그대로 라우터로 들어오는 SYN 패킷 요청을 그대로 서버에 넘겨주지 않고 라우터에서 일단 가로채어(Intercept 하여) 서버를 대신하여 SYN 패킷을 요청한 클라이언트와 연결을 맺고, 연결이 정상적으로 이루어지면 이번에는 클라이언트를 대신하여 서버와 연결을 맺은 다음 두 연결을 투명하게 포워딩하여 연결시켜주는 방식이다. 따라서 존재하지 않는 IP 로부터 오는 SYN 요청은 서버에 도달하지 못하게 되는 것이다. 두번째 방식은 “와치(watch) 모드” 라 하여 “인터셉트 모드”와는 달리 라우터를 통과하는 SYN패킷을 그대로 통과시키고 일정 시간동안 연결이 이루어지지 않으면 라우터가 중간에서 SYN 패킷을 차단하는 방식이다. 몇몇 방화벽에서도 위의 두 가지 방식으로 SYN Flooding 을 차단하고 있다. 실제로 tcp intercept 를 설정하여 테스트 결과 서버 레벨에는 전혀 스푸핑된 SYN 패킷이 보내지지 않아 SYN_Flooding 공격을 차단하기 위한 가장 확실한 방법이기는 했지만 아쉽게도 라우터의 CPU, Memory 부하가 너무 높아지는 단점이 있었다. 이 설정에 대해 궁금하신 분은 http://www.cisco.com/접속후 "tcp intercept" 로 검색해 보기 바란다. 이 설정을 했을 경우에는 모든 패킷에 대해 인터셉트를 하므로 트래픽이 많을 경우에는 라우터가 다운되는 경우도 있으니 설정시 각별히 주의하기 바란다.


(6) Windows NT/2000 계열에서는 Registry값을 수정함으로써 튜닝이 가능하다.
이 값에 대한 튜닝은 Microsoft 의 technical page 나 
http://packetstorm.securify.com/groups/rhino9/synflood.doc를 다운로드 받아 참고하기 바란다.
AIX나 Solaris등 다른 UNIX 계열에 대한 튜닝은 
http://www.cymru.com/~robt/Docs/Articles/ip-stack-tuning.html를 참고하기 바란다.


(7) CRON 을 이용해 SYN_Flooding 공격을 감지한다.
아 무리 튜닝을 잘 했다 하더라도 집중적으로 SYN Flooding 공격을 받을 때는 네트워크나 서비스 데몬이 이상 작동할 수도 있다. 그래서 이상 현상이 나타나기 전에 일정 시간마다 시스템에 로그인하여 netstat 으로 확인할 수 있겠지만 언제 공격이 들어올 줄 알고 지켜보고 있겠는가? 그래서 필자는 SYN Flooding 을 감지하기 위해 다음과 같이 간단한 스크립트를 짜서 공격이 확인되면 메일로 통보되도록 하여 사용중이다.

#!/usr/bin/perl

$TASK = `netstat -na|grep SYN_RECV`;
$HOSTNAME = `/bin/hostname`;
$TO_MAIL = 'antihong@tt.co.kr'; 
$SUBJECT = "$HOSTNAME SYN_FLOODING 공격 감지";
$MAIL_PROGRAM = "/usr/sbin/sendmail";

if ($TASK){
$TASK_CONFIRM = `netstat -na|grep SYN_RECV|wc -l`;

if($TASK_CONFIRM > 20){
`/etc/rc.d/init.d/httpd stop`;
`/etc/rc.d/init.d/httpd start`;
$HTTP_DONE ="httpd was Refreshed!!\n";
}

open(MAIL, "|$MAIL_PROGRAM -t");
print MAIL "To: $TO_MAIL \n";
print MAIL "Subject: $SUBJECT \n\n";
print MAIL "$HOSTNAME Server is Attacked by SYN_Flooding!!!\n";
print MAIL "SYN_Flooding Process Number :$TASK_CONFIRM \n";
print MAIL "$HTTP_DONE\n";
print MAIL "$TASK \n";
close(MAIL);
}


위 파일의 내용중 $TO_MAIL 은 공격 감지시 통보될 메일 주소이므로 자신의 e-mail 주소로 변경하고, 불완전한 SYN 패킷이 20개 이상일 경우 ($TASK_CONFIRM > 20)
`/etc/rc.d/init.d/httpd stop`; 과 `/etc/rc.d/init.d/httpd start`; 으로 웹데몬을 멈추었다가 시작하도록 설정하였는데, 이는 자신의 설정에 맞게 적절히 수정하도록 한다.
물론 SYN Flooding 공격이 특정 포트에 대해서만 가능한 것은 아니지만 거의 80번 포트에 대해 집중적으로 이루어지고 있으므로 웹데몬을 예로 설정한 것 뿐이다. 

위 파일의 내용을 /etc/cron.5min/ 이라는 디렉토리에 두고 실행할 수 있도록 700 으로 설정해 둔다. 그리고 /etc/crontab 파일을 열어 아래 내용을 추가하면 5분마다 SYN_Flooding 여부를 체크하여 공격이 확인시 지정된 메일 주소로 통보해 준다..

59/5 * * * * root run-parts /etc/cron.5min/

출처 : http://community.365managed.com/?mid=server&page=2&document_srl=281217